Fun Project 1: Pump Stopper
This is the project I’ve been working on over the last few days.
The product
My partner set me a challenge to protect our off-grid water tank contents. I figured I’d program a smart switch to prototype the solution here.
Hypothesis: The pump consumes electricity as it releases water to our taps. If there were a leak, after the pump, the pump would continue running for an unusually long time. Cutting power to the pump in such a situation will prevent further leaks and force someone to come check the pipework.
Risks: The control must have as few dependencies as possible. The smart switch should have local control and perform the decision-making itself.
Context: Our Wifi is somewhat unreliable, especially with weak microcontroller Wifi, let alone the Internet being fixed wireless! So we don’t want the Internet being down to stop automatically turning off the pump.
Equipment available: We need a smart switch/socket that does energy monitoring. It so happens I was lucky enough to buy up some (but not enough, after this project - do contact me if you have more) of the hackable Arlec Grid Connect PC191HA Smart Sockets with Energy Monitoring. These come with a cloud connection (tip: use the SmartLife app, not the Grid Connect app) via Tuya, but via tuya-cloudcutter we can install OpenBeken or ESPHome. I started with the former.
The journey
So I started simple. Can I detect when the pump is delivering water?
Yes. Our pump is a constant flow and draws 600W. There is noise in the values of course. Let’s set a threshold and say over 300W the pump is running and under 300W, it’s not.
I had an installation of Home Assistant sitting dormant on my “home lab” and I used the Tuya integration to get me started here. I could use Helpers and an Automation to get the job done of stopping the pump after 10 minutes of running. I could show the time the pump had been running (to minutes precision) on a Dashboard. All very cool.
However this does not meet all of the aims - as in, what if Home Assistant goes down? It’s an experimental “home lab” after all, not a “mission critical” deployment. What if the wifi goes down? My router does drop connections now and then. This is especially notable with smart devices and cameras.
So I needed local control. I started with wresting control away from the Internet. This is achieved by using Local Tuya as the integration instead. You have to get a Tuya Developer account and jump through some hoops here, so I do not feel like this is sustainable.
So what I really needed to do was move away from the Tuya cloud. However I wasn’t invested enough, nor am I patient enough to wait for shipping to get a new plug yet. I am super-lucky that some of the plugs in my house were already hackable.
I used Tuya Cloud-Cutter take my Arlec (Bunnings) plug from Tuya to OpenBeken (similar to Tasmota). I blindly chose OpenBeken, I could also have chosen ESPHome but for now I haven’t needed to try that second option.
However my partner is nudging me to add more features already to make it more “marketable” in the future.
The solution
There are some unique things that I’m very happy with about OpenBeken but it is very quirky. I love the web UI built-in (that piggy-backs off GitHub) and the fact that it’s scriptable without rebuilding firmware. The “LittleFS” really is little (kilobytes!) but is a game-changer for experimentation.
The integration via MQTT to Home Assistant is fantastic.
I’m certain I do not know enough about this firmware yet, but enough to be dangerous. But what can I possibly break? The worst that can happen is I turn off the plug.
The pump stopping behaviour
The logic we’re trying to implement is:
- If the switch is on, and we are above the energy consumption threshold then the pump is active
- While the pump is active count the number of seconds that it is continuously active
- If the pump is active for more than, say, 600 seconds (10 minutes) then turn off the switch and wait for someone to turn it back on (physically or remotely)
This is fully autonomous. This turns out pretty straightforward to script up, and all you do is build a series of commands in a (classic!) autoexec.bat, in my case:
1
2
3
4
5
6
7
8
9
10
11
12
13
14
15
16
17
18
19
20
21
22
23
24
25
26
27
28
29
30
31
32
33
34
35
36
37
// Fixes the heat by lowering WiFi power usage
PowerSave 1

// Starts the clock (needed for scheduled rules)
startDriver NTP

// 2. Set the Perth offset (UTC+8)
ntp_timeZoneOfs 8

// Starts the energy monitoring hardware
startDriver BL0937

// Enable stats: Turn on, 60s check, 5m history
SetupEnergyStats 1 60 5

// Commands

// Turns pump off
alias pumpoff setChannel 1 0

// Count time
alias timeup addChannel 10 1

// If pump is active too long turn off
alias pumpactive if $Ch10>600 then pumpoff else timeup

// If pump is inactive stop counting
alias pumpinactive if $Ch10>0 then setChannel 10 0

// Check pump
alias pumpcheck if $Ch1==1&&$Power>300 then pumpactive else pumpinactive

// Check pump once per second
addRepeatingEvent 1 -1 pumpcheck

// Summarise pump
//alias pumpstat echo "[$Ch0,$Ch10,$Power]"
I’ve also set some settings in the web configuration, things like telling the smart switch to turn itself on after being plugged in or a power failure, so we can get water, and of course I’ve programmed in my wifi and _Home Assistant settings, but this would equally work without any wifi at all._
That last command is a tease. What good is something that you can’t check the status of, or optionally interact with remotely?
The web interface
I used Google Gemini to help me figure the scripting and a web UI, and frankly, apart from the run-of-the-mill web UI, it was perpetually confidently wrong about the operation of my firmware in my plug. So there’s work to be done there, but I’m here to report that after quite the bootstrapping journey I’m (probably) done.
I’d like to share some tips that I wish I knew when I started playing with the plug:
- The plug heats up with use and your frenzied coding and logging doesn’t help. Take breaks!
- You upload your custom web application to “LittleFS” and access it via the “/api/lfs/” paths - this part is known, but…
- This firmware does not offer the facility to place nice button(s) on the main page to nudge people to your UI, however I have a workaround!
Hijacking the web UI
There is a built-in link and customisation option for the “Web Application”. This is intended to be the OpenBeken Web App. You however cannot just change the web app to your HTML page – it assumes that it’s going to find a loader called startup.js at the web location you specify.
Assuming you uploaded index.html to your plug, to have that be your web app, you must also upload a startup.js with:
1
location.replace(location.origin+"/api/lfs/index.html");
Then set (noting that your IP of your plug can change!) the “Configure WebApp” option to /api/lfs (i.e. a relative link).
The next important tip is that you’ll want to first make sure you can get back into the main web app. Of course all you have to do is reset the URL back to https://openbekeniot.github.io/webapp/, but I chose to include such a link into my own web app (of course I hid it).
To get this to work, I just cloned (via the browser developer tools) the original loader from /app, for me this was:
1
<!DOCTYPE html><html><head><title>PumpStop1_OpenBeken7231T_76CC0687</title><link rel='shortcut icon' href='data:image/gif;base64,R0lGODlhEAAQALMAABEHBLT+BJxCBFgmBHx6fKxKBCQiJCIWC/ppBJSWlNTS1Pv9+0xmBDo7Oow6BNlZBCH5BAEAAAsALAAAAAAQABAAAwRzcMm5UqKYtjFalkpjEACCAITRKJrwHOV5PII3GQ/yAM+ePwYKYYYoOBwF3YEwaQCehQODcSg8AZ7EwPRwMAIBhiOHGFi2Oi9YTDYvnFAp1fq0LYY5I1LJvP14PjpBTS4wJgAzNRQhIzEoKiwfGx0fGRYfEQA7' /><meta charset="utf-8"><meta name="viewport" content="width=device-width,initial-scale=1,user-scalable=no"><meta name="robots" content="none"><script>var root='https://openbekeniot.github.io/webapp/',device=window.location.origin;</script><script src='https://openbekeniot.github.io/webapp//startup.js'></script></head><body></body></html>
And I saved that as origwebapp.html and linked to that.
So now we can refine the web UI and make use of the built-in API to populate the page with data.
JSON is the key here, and while there are built-in status commands, you’ll find writing your own “echo” command far more lightweight, so I did that instead. It also reduces the number of API calls required.
It’s probably out of scope for this very long blog post to show the code, I don’t think it’s polished enough either yet (I feel a GitHub Gist coming on), but to give you the idea, here’s what it looks like: 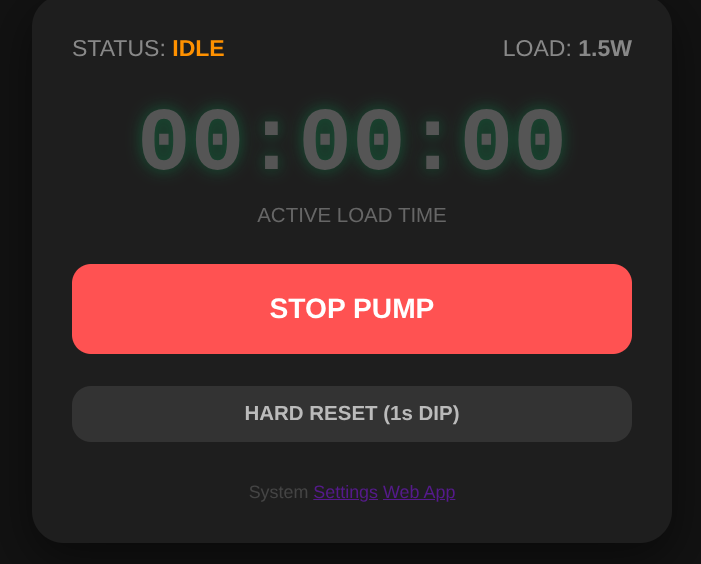
What’s next?
As noted there’s more ideas.
First, a bit more interaction, but, frankly, I’ll probably just defer to Home Assistant for that. We need notifications to announce that an issue occurred, rather than just blocking the water. Similarly we want an easy way to bypass the cutoff if we were, say, genuinely purging the tank or filling something up. I ruled out automatically turning it back on after a time-out.
Second, I do have the LED to play with, I could send some information out that way too and/or make use of the button.
Third, move away from hardcoded values. What if we moved to a different-sized pump, or we wanted a different delay.
And lastly, generalising this to more use cases. For example, I’d love to be able fully, for safety, cut power to my e-bike chargers when I detect that they are done (rather than just based on time). A similar principle applies there.
But that is waiting for me to find more hackable smart switches. Looks like I’ll have to buy “Athom” Tasmota switches now and tweak the solution a bit… anyone got any Arlec switches for trade?
⌨